
- Help Center
- Accelerate
- Filling In and Uploading the Excel Sheets
-
Getting started
-
Integrations
-
PGA x Accelerate
-
API
-
Assortments & Catalogs
- Creating Order From Favorites- Using the Multi Delivery Board
- Digital Catalog Editor-Creating Your Digital Catalog
- How to Create an Assortment
- Adding a Canvas Page
- Linking a Showroom or Technical Video to a Feature Page
- Creating an Assortment with Embroidery
- Video Demo of Virtual Showroom
- Favorites List Workflow
- Multidate Orders using the Digital Catalog Enhancement
- Ordering From the Digital Catalog
- New Wish List Features
- Setting Permissions
- Browsing and Marking Up the Digital Catalog- Creating and Shopping a Favorites List
- Creating a Line Sheet
- Wish List Tutorial
- Wish List Cover Images
- New Assortments Tab
- FAQ's
- Catalog- Single Page Mode for Smaller Form Factors
-
Wholesale Order Entry
-
Accelerate
- RepSpark Go App
- Exporting My Orders
- Admin Dashboard
- Setting Up and Managing My Users
- Filling In and Uploading the Excel Sheets
- Filters and Sorting Products
- Getting Started
- Creating My Digital Catalog
- Adding My Images
- Reporting
- Exporting ATS to Excel
- Branding My Site
- Insignia Lite in Accelerate
- FAQ's- Really, FAQ's
-
Microsites
-
Admin
-
Data Management
-
B2B Users
-
Marketing
-
Reporting & Analytics
-
Software Updates
-
Internal
-
Community
-
RepSpark Pay
Updating Data in My Files
To Update data in the files after they are dropped in the first time, you will add data to the existing files and redrop them. Please remember- they need to be named exactly liek the first time (not with a v2 or new date or something like that.)
DO NOT DROP A BLANK FILE OR A NEW FILE THAT JUST HAS THE NEW LINE OF DATA. THIS WILL WIPE OUT ALL PREVIOUS DATA.
If you know the version you saved has all data, simply add the next line and drop the file back in. If you want to make sure you have the latest, you can download the file with the existing data from the site, fill in the new line of data and drop back into the upload area. To work in this way follow the steps below:
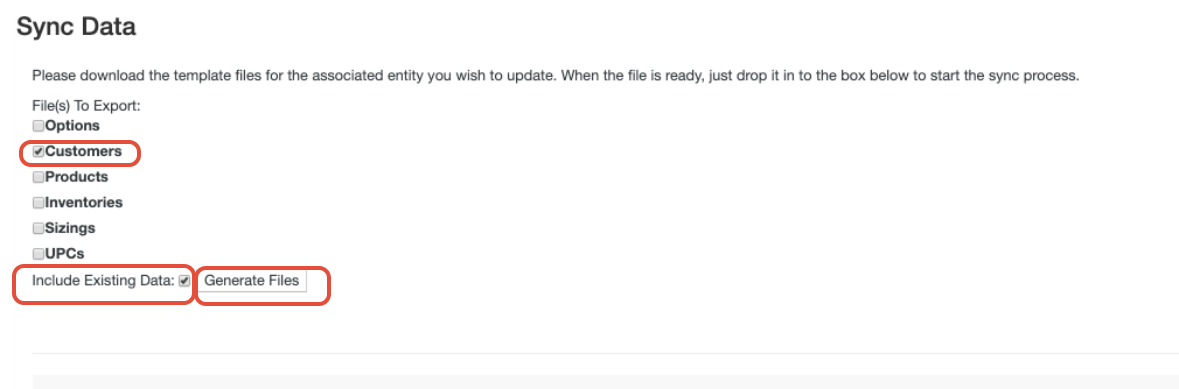
1. Go to the Admin tab
2. Choose sync data
3. Check the checkbox next to the file you want to upload. You can check multiple at the same time if working on updating more than one.
4. Then, click Include existing data.
5. Last, click generate files.
4. Each excel file will be made available with all existing data populated.
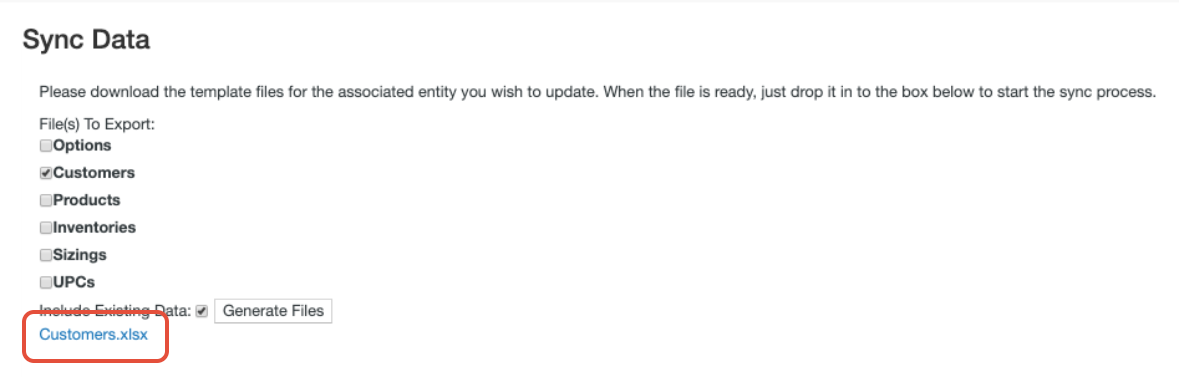
5. Once you have downloaded the file and made the changes, save the file with the same name. Then, drag the file back into the Drop Data Here area on the same page.